1.1 目标
- 掌握Smarty模板技术的实际运用;
- 掌握Smarty模板技术的基础配置;
- 掌握常用的smarty内置函数应用;
- 掌握模板变量的使用以及常见的保留变量的使用;
- 了解smarty配置文件的使用规范;
- 掌握Smarty中内置函数:if分支、foreach和section循环的使用
- 掌握Smarty在类中引入实现子类便捷使用的方式
1.4 Smarty简介
1.4.1 Smarty的引入
1、为了分工合作,模板页面中最好不要出现PHP的代码。
2、需要将表现和内容相分离
1.2.2 Smarty介绍

1.5 自定义Smarty
1.3.1 演化一:(smarty生成混编文件)
在模板中不能出现PHP定界符,标准写法如下:
1、html代码
<body>
{$title}
</body>
2、PHP代码
<?php
    $title='锄禾';
    require './1-demo.html';
运行结果

不能解析的原因是:PHP不能识别 { 和 }
解决:
将大括号替换成PHP的定界符

代码实现
<?php
$title='锄禾';
$str=file_get_contents('./index.html');
$str=str_replace('{','<?php echo ',$str);    //替换左大括号
$str=str_replace('}',';?>',$str);            //替换右大括号
file_put_contents('./index.html.php', $str);    //写入混编文件
require './index.html.php';    //包含混编文件
运行

1.3.2 演化二:(smarty封装)
由于每个页面都要替换定界符,所以需要将替换定界符的代码封装起来
由于封装在类中,所有访问的方法需要通过面向对象的方式来访问

1、创建Smarty.class.php
<?php
class Smarty{
    private $tpl_var=array();
    //赋值
    public function assign($k,$v){
        $this->tpl_var[$k]=$v;
    }
    /*
    *作用:编译模板
    *@param $tpl string 模板的路径
    */
    public function compile($tpl){
        $com_file=$tpl.'.php';        //混编文件地址
        $str=file_get_contents($tpl);
        $str=str_replace('{$','<?php echo $this->tpl_var[\'',$str);    //替换左大括号
        $str=str_replace('}','\'];?>',$str);            //替换右大括号
        file_put_contents($com_file, $str);    //写入混编文件
        require $com_file;    //包含混编文件
    }
}
2、在index.php
<?php
require './Smarty.class.php';
$smarty=new Smarty();
$smarty->assign('title','锄禾');
$smarty->compile('./index.html');
小结:
1、需要将外部的变量赋值到对象的内部
2、要通过面向对象的方式访问
1.3.3 演化三:(有条件的生成混编文件)
混编文件存在并且是最新的就直接包含,否则就重新生成
模板文件修改时间<混编文件修改时间 => 混编文件是最新的
Smarty类中的代码编译代码如下
<?php
class Smarty{
    private $tpl_var=array();
    //赋值
    public function assign($k,$v){
        $this->tpl_var[$k]=$v;
    }
    /*
    *作用:编译模板
    *@param $tpl string 模板的路径
    */
    public function compile($tpl){
        $com_file=$tpl.'.php';        //混编文件地址
        //文件存在,并且模板文件修改时间<混编文件修改时间
        if(file_exists($com_file) && filemtime($tpl)<filemtime($com_file))
            require $com_file;
        else{
            $str=file_get_contents($tpl);
            $str=str_replace('{$','<?php echo $this->tpl_var[\'',$str);    //替换左大括号
            $str=str_replace('}','\'];?>',$str);            //替换右大括号
            file_put_contents($com_file, $str);    //写入混编文件
            require $com_file;    //包含混编文件
        }
    }
}
小结:
生成混编文件的条件
1、混编不存在
2、模板修改了, 模板文件修改时间>混编文件修改时间,说明模板修改过了。
1.3.4 演化四:文件分类存放
- 模板文件:view
- 混编文件:viewc
- Smarty文件:smarty.class.php
Smarty.class.php代码如下:
<?php
class Smarty{
   public $template_dir='./templates/';    //默认模板目录
   public $templatec_dir='./templates_c/';    //默认混编目录

   private $tpl_var=array();
   //赋值
   public function assign($k,$v){
       $this->tpl_var[$k]=$v;
   }
   /*
   *作用:编译模板
   *@param $tpl string 模板的名字
   */
   public function compile($tpl){
       $tpl_file=$this->template_dir.$tpl;    //拼接模板地址
       $com_file=$this->templatec_dir.$tpl.'.php';        //混编文件地址
       //文件存在,并且模板文件修改时间<混编文件修改时间
       if(file_exists($com_file) && filemtime($tpl_file)<filemtime($com_file))
           require $com_file;
       else{
           $str=file_get_contents($tpl_file);
           $str=str_replace('{$','<?php echo $this->tpl_var[\'',$str);    //替换左大括号
           $str=str_replace('}','\'];?>',$str);            //替换右大括号
           file_put_contents($com_file, $str);    //写入混编文件
           require $com_file;    //包含混编文件
       }
   }
}
index.php代码如下
<?php
require './Smarty/Smarty.class.php';
$smarty=new Smarty();
$smarty->template_dir='./view/';    //更改模板目录
$smarty->templatec_dir='./viewc/';    //更改混编目录
$smarty->assign('title','锄禾');
$smarty->compile('index.html');
1.3.5 演化五:封装编译方法
编译的方法是smarty的核心方法,核心方法一般是不可以直接调用,需要进行二次封装
smarty.class.php
<?php
class Smarty{
    ...
    public function display($tpl){
        require $this->compile($tpl);
    }
    /*
    *作用:编译模板
    *@param $tpl string 模板的名字
    */
    private function compile($tpl){
        ..
        //文件存在,并且模板文件修改时间<混编文件修改时间
        if(file_exists($com_file) && filemtime($tpl_file)<filemtime($com_file))
            return $com_file;    //返回混编地址
        else{
            $str=file_get_contents($tpl_file);
            $str=str_replace('{$','<?php echo $this->tpl_var[\'',$str);    //替换左大括号
            $str=str_replace('}','\'];?>',$str);            //替换右大括号
            file_put_contents($com_file, $str);    //写入混编文件
            return $com_file;    //返回混编地址
        }
    }
}
index.php
<?php
...
$smarty->assign('title','锄禾');
$smarty->display('index.html');    //传递文件名
1.6 官方Smarty介绍
1.6.1 smarty目录结构
到www.smarty.net网站下载最新的smarty版本

解压
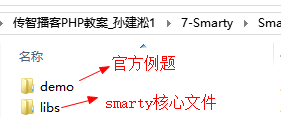
libs目录结构
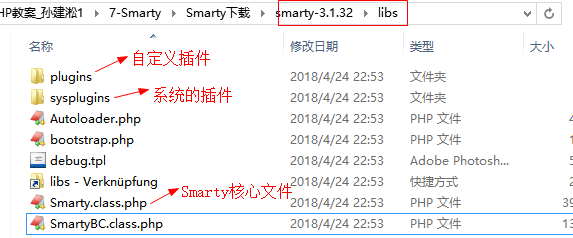
需要掌握的smarty的属性和方法
public $left_delimiter = "{";        //左界定
public $right_delimiter = "}";        //右界定
protected $template_dir = array('./templates/');    //默认模板目录
protected $compile_dir = './templates_c/';            //默认混编目录
protected $config_dir = array('./configs/');        //默认配置目录
protected $cache_dir = './cache/';                    //默认缓存目录


public function setTemplateDir(){}                    //设置模板文件夹
public function setConfigDir(){}                    //设置配置文件夹
public function setCompileDir(){}                    //设置混编文件夹
public function setCacheDir(){}                        //设置缓存文件夹
练习:
以下关于Smarty配置描述正确的是(ABCD)
    A: 使用left_delimiter属性可以修改Smarty左定界符;
    B: 使用right_delimiter属性可以修改Smarty右定界符;
    C: 使用setTemplateDir()方法可以重新指定默认模板工作目录;
    D: 使用setCompileDir()方法可以重新指定默认编译文件工作目录。
1.6.2 smarty简单的操作
1、将libs目录拷贝到站点下,改名为smarty
2、创建模板目录templates
3、创建混编目录templates_c
4、在站点下创建1-demo.php
<?php
require './Smarty/Smarty.class.php';
$smarty=new Smarty();
$smarty->assign('title','锄禾');
$smarty->left_delimiter='{{';        //更改左界定
$smarty->right_delimiter='}}';        //更改右界定
$smarty->setTemplateDir('./view/');    //设置模板目录
$smarty->setCompileDir('./viewc/');    //设置混编目录
$smarty->display('1-demo.html');
在templates下创建demo1.html
<body>
    {{$title}}
</body>
1.6.3 注释
语法:{ }

注意:smarty注释在源码中看不见。
思考:已知smarty的定界符是{ 和 },那么它的注释是什么?
答:{ }
1.2 变量
smarty中变量有3中,普通变量、配置变量、保留变量
1、普通变量
普通变量就是我们自己定义的变量
方法一:在PHP中定义
$smarty->assign('name','tom');方法二:可以在模板定义
语法:{assign var='变量名' value='值'}

例如:{assign var='sex' value='男'}
简化写法:
{$sex='男'}例题:
php代码
<?php
require './Smarty/smarty.class.php';
$smarty=new Smarty();
$smarty->assign('name','tom');        //给变量赋值
$smarty->display('1-demo.html');
HTML代码
<body>
    姓名:{$name}  <br>

    {assign var='age' value=20}
    年龄:{$age}<br>

    {$add='北京'}
    地址:{$add}
</body>
运行结果

2、保留变量
Smarty中有一个特殊的保留变量(内置变量),类似于PHP中的所有的超全局变量、常量、时间等信息
| 表达式 | 描述 |
|---|---|
| {$smarty.get.name} | 获取get提交的name的值 |
| {$smarty.post.name} | 获取post提交的name的值 |
| {$smarty.request.name} | 获取get和post提交的name的值 |
| {$smarty.cookies.name} | 获取cookie中的name的值 |
| {$smarty.session.name} | 获取session中的name的值 |
| {$smarty.const.name} | 获取常量name |
| {$smarty.server.DOCUMENT_ROOT} | 获取服务器的虚拟目录地址 |
| {$smarty.config.name} | 获取配置文件中的值 |
| {$smarty.now} | 时间戳 |
| {$smarty.ldelim} | 获取左界定 |
| {$smarty.rdelim} | 获取右界定 |
例题
PHP代码
<?php
require './Smarty/smarty.class.php';
$smarty=new Smarty();
define('name', '常量name');
setcookie('name','cookie的值');
$_SESSION['name']='session的值';
$smarty->display('1-demo.html');
HTML代码
<body>
get提交:{$smarty.get.name}<br>
post提交:{$smarty.post.name}<br>
request提交:{$smarty.request.name}<br>
常量:{$smarty.const.name}<br>
cookie的值:{$smarty.cookies.name}<br>
session:{$smarty.session.name}<br>
时间戳:{$smarty.now}<br>
版本号:{$smarty.version}<br>
根目录:{$smarty.server.DOCUMENT_ROOT}<br>
左界定:{$smarty.ldelim}<br>
右界定:{$smarty.rdelim}
</body>
运行结果
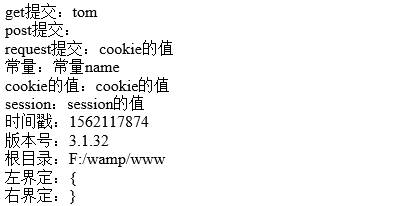
3、配置变量
从配置文件中获取变量值,配置文件默认的文件夹是configs
1、在站点下创建配置文件夹configs
2、在configs目录下创建smarty.conf文件
color='#FF0000';
size='15px';
3、PHP页面
<?php
require './Smarty/smarty.class.php';
$smarty=new Smarty();
$smarty->display('1-demo.html');
4、HTML页面
{config_load file='smarty.conf'}   <!--引入配置文件-->
<style>
body{
    color:{#color#};
    font-size: {$smarty.config.size}
}
</style>
小结:
1、要使用配置文件中的值,首先必须引入配置文件,通过{config_load}标签引入
2、获取配置文件中的值的方法有两种
第一:{#变量名#}
第二:{$smarty.config.变量名}
多学一招:配置文件中的节
在配置文件中,‘[ ]’表示配置文件的段落
例题:
配置文件
color=#FF0000
size=30px

[spring]    # 配置文件中的段落
color=#009900;
size=20px;

[winter]
color=#000000;
size=5px;
注意:
1、全局的一定要写在节的前面
2、配置文件中[]表示节
3、配置文件中的注释是 #
HTML页面
{config_load file='smarty.conf' section='winter'}   -- 通过section引入配置文件中的段落
<style>
body{
    color:{#color#};
    font-size: {$smarty.config.size}
}
</style>
1.3 运算符
smary中的运算符是PHP是一样的。除此以外,smarty还支持如下的运算符。
| 运算符 | 描述 |
|---|---|
| eq | equal 相等 |
| neq | not equal 不等于 |
| gt | greater than 大于 |
| lt | less than 小于 |
| lte | less than or equal 小于等于 |
| gte | great than or equal 大于等于 |
| is even | 是偶数 |
| is odd | 是奇数 |
| is not even | 不是偶数 |
| is not odd | 不是奇数 |
| not | 非 |
| mod | 求模取余 |
| div by | 被整除 |
| is [not] div by | 能否被某数整除,例如:{if $smarty.get.age is div by 3}...{/if} |
| is [not] even by | 商的结果是否为偶数 |
| is [not] odd by | 商的结果是否为奇数 |
1.4 判断
语法:
{if 条件}

{elseif 条件}

{else}

{/if}
例题:
php代码
<?php
require './Smarty/smarty.class.php';
$smarty=new Smarty();
$smarty->display('1-demo.html');
html代码
<body>
{if is_numeric($smarty.get.score)}    {#判断是否是数字#}
    {if $smarty.get.score gte 90}
        A
    {elseif $smarty.get.score gte 80}
        B
    {else}
        C
    {/if}
{else}
    不是数字
{/if}

<hr>
{if $smarty.get.score is even}
    是偶数
{elseif $smarty.get.score is odd}
    是奇数
{/if}
</body>
运行结果

小结:在判断中是可以使用PHP的函数的
1.5 数组
smarty中访问数组的方式有两种
数组[下标]
数组.下标
PHP代码
<?php
require './Smarty/smarty.class.php';
$smarty=new Smarty();
$stu=array('tom','berry');        //索引数组
$emp=array('name'=>'rose','sex'=>'女');    //关联数组
$goods=array(
    array('name'=>'手机','price'=>22),
    array('name'=>'钢笔','price'=>10)
);
$smarty->assign('stu',$stu);
$smarty->assign('emp',$emp);
$smarty->assign('goods',$goods);
$smarty->display('2-demo.html');
HTML代码
<body>
学生:{$stu[0]}-{$stu.1}  <br>
雇员:{$emp['name']}-{$emp.sex}<br>
商品:
<ul>
    <li>{$goods[0]['name']}</li>
    <li>{$goods[0].price}</li>
    <li>{$goods.1['name']}</li>
    <li>{$goods.1.price}</li>
</ul>
</body>
运行结果
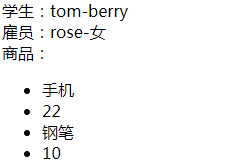
1.6 循环
smarty中支持的循环有:{for}、{while}、{foreach}、{section}。对于开发来说用的最多就是{foreach}循环
1.6.1 for
语法:
{for 初始值 to 结束值 [step 步长]}

{/for}
 默认步长是1
例题
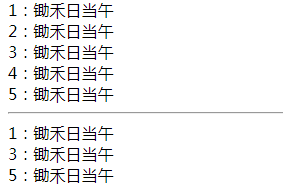
<body>
{for $i=1 to 5}
    {$i}:锄禾日当午<br>
{/for}
<hr>
{for $i=1 to 5 step 2}
    {$i}:锄禾日当午<br>
{/for}
</body>
运行结果
1.6.2 while
语法
{while 条件}

{/while}
例题(输出5句):
<body>
{$i=1}
{while $i<=5}
    {$i++}:锄禾日当午<br>
{/while}
</body>
1.6.3 foreach
既能遍历关联数组也能遍历索引数组
语法:
{foreach 数组 as $k=>$v}

{foreachelse}
    没有数组输出
{/foreach}
foreach的属性
@index:从0开始的索引
@iteration:从1开始的编号
@first:是否是第一个元素
@last:是否是最后一个元素
PHP代码
<?php
require './Smarty/smarty.class.php';
$smarty=new Smarty();
$smarty->assign('stu',array('first'=>'tom','second'=>'berry','third'=>'ketty','forth'=>'rose'));
$smarty->display('3-demo.html');
html代码
<table border='1' bordercolor='#000' width='780'>
    <tr>
        <th>是否是第一个元素</th>
        <th>索引</th>
        <th>编号</th>
        <th>键</th>
        <th>值</th>
        <th>是否是最后一个元素</th>
    </tr>
    {foreach $stu as $k=>$v}
    <tr>
        <td>{$v@first}</td>
        <td>{$v@index}</td>
        <td>{$v@iteration}</td>
        <td>{$k}</td>
        <td>{$v}</td>
        <td>{$v@last}</td>
    </tr>
    {foreachelse}
        没有输出
    {/foreach}
</table>
运行结果

1.6.4 section
section不支持关联数组,只能遍历索引数组
语法:
{section name=自定义名字 loop=数组}
{/section}
例题:
php
<?php
require './Smarty/smarty.class.php';
$smarty=new Smarty();
$smarty->assign('stu',array('tom','berry'));
$smarty->display('4-demo.html');
html代码
<table border='1' bordercolor='#000' width='780'>
<tr>
    <th>是否是第一个元素</th>
    <th>索引</th>
    <th>编号</th>
    <th>值</th>
    <th>是否是最后一个元素</th>
</tr>
{section name=s loop=$stu}
<tr>
    <td>{$smarty.section.s.first}</td>
    <td>{$smarty.section.s.index}</td>
    <td>{$smarty.section.s.iteration}</td>
    <td>{$stu[s]}</td>
    <td>{$smarty.section.s.last}</td>
</tr>
{sectionelse}
    没有输出
{/section}
</table>
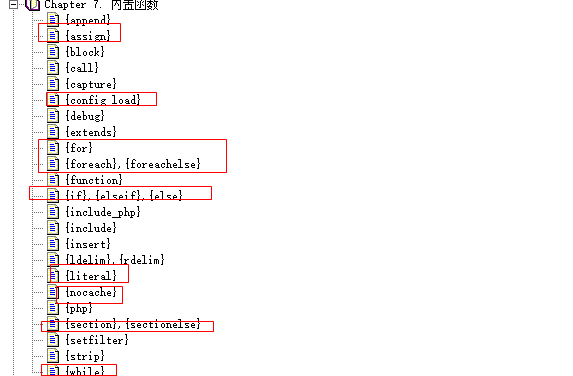
1.7 函数
函数有两种,自定义函数和内置函数
smarty的内置函数就是封装的PHP的关键字
1.8 变量修饰器
1.8.1 变量修饰器
变量修饰器的本质就是PHP函数,用来转换数据
php代码
<?php
require './Smarty/smarty.class.php';
$smarty=new Smarty();
$smarty->display('5-demo.html');
html代码
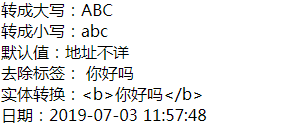
<body>
转成大写:{'abc'|upper} <br>
转成小写:{'ABC'|lower} <br>
默认值:{$add|default:'地址不详'}<br>
去除标签:{'<b>你好吗</b>'|strip_tags}<br>
实体转换:{'<b>你好吗</b>'|escape}<br>
日期:{$smarty.now|date_format:'%Y-%m-%d %H:%M:%S'}
多个管道连续使用:{'<b>boy</b>'|strip_tags|upper}<br>
</body>
运行结果
注意:
1、将PHP的关键字或函数封装成标签称为函数,将PHP关键字封装成smarty关键字称为修饰器。内部的本质都是、PHP函数或PHP关键字。
2、|称为管道运算符,将前面的参数传递后后面的修饰器使用
1.8.2 自定义变量修饰器
变量修饰器存放在plugins目录中
规则:
- 文件的命名规则:modifier.变量修饰器名称.php
- 文件内方法命名规则:smarty_modifier_变量修饰器名称(形参...){}
例题
1、在plugins目录中创建modifier.cal.php页面
<?php
function smarty_modifier_cal($num1,$num2,$num3){
    return $num1+$num2+$num3;
}
2、在模板中调用
{10|cal:20:30}

10作为第一个参数传递
参数之间用冒号分隔
1.9 避免Smarty解析
smarty的定界符和css、js中的大括号产生冲突的时候,css、js中的大括号不要被smarty解析
方法一:更换定界符
方法二:左大括号后面添加空白字符
方法三:{literal} {/literal}
smarty不解析{literal} {/literal}中的内容
<style>
{literal}
body{color: #FF0000;}
{/literal}
</style>
1.10 缓存
缓存:页面缓存、空间缓存、数据缓存。smarty中的缓存就是页面缓存
smarty的缓存是页面缓存。
1.10. 1 开启缓存
$smarty->caching=true|1; //开启缓存1.10.2 缓存的更新
方法一:删除缓存,系统会重新生成新的缓存文件
方法二:更新了模板文件,配置文件,缓存自动更新
方法三:过了缓存的生命周期,默认是3600秒
方法四:强制更新
PHP代码
<?php
require './Smarty/smarty.class.php';
$smarty=new Smarty();
$smarty->caching=true;        //开启缓存
if(date('H')>=9)
    $smarty->force_cache=true;    //强制更新缓存
$smarty->display('6-demo.html');
1.10.3 缓存的生命周期
$smarty->cache_lifetime=-1 | 0 | N
-1:永远不过期
0:立即过期
N:有效期是N秒,默认是3600秒
PHP代码
$smarty->cache_lifetime=3; //缓存的生命周期1.10.4 局部不缓存
局部不缓存有两种方法
1、变量不缓存    {$变量名  nocache}
2、整个块不缓存   {nocache}   {/nocache}
代码
不缓存:{$smarty.now nocache}  <br>
不缓存:{nocache}
    {$smarty.now}<br>
{/nocache}
1.10.5 缓存分页
通过$smarty->display(模板,识别id)。通过识别id来缓存分页、集合
PHP页面
<?php
require './Smarty/smarty.class.php';
$smarty=new Smarty();
$smarty->caching=1;
$smarty->display('7-demo.html',$_GET['pageno']);
html页面
<body>
    这是第{$smarty.get.pageno}页
</body>
运行结果

1.10.6 缓存集合

每个组合都会产生缓存
PHP代码
<?php
require './Smarty/smarty.class.php';
$smarty=new Smarty();
$smarty->caching=1;
$color=$_GET['color'];
$size=$_GET['size'];
$smarty->display('7-demo.html',"$color|$size");
HTML代码
<body>
    颜色:{$smarty.get.color}<br>
    大小:{$smarty.get.size}
</body>
运行结果


1.10.7 清除缓存
$smarty->clearCache(模板,[识别id])
$smarty->clearAllCache();   //清除所有缓存
代码
<?php
require './Smarty/smarty.class.php';
$smarty=new Smarty();
//$smarty->clearCache('7-demo.html',1);
//$smarty->clearCache('7-demo.html','red|10');
//$smarty->clearCache('7-demo.html');
$smarty->clearAllCache();    //清除所有缓存
1.11 将smarty集成到项目中
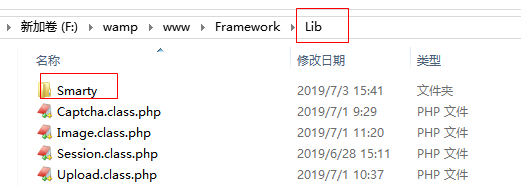
1、将smarty拷贝到Lib目录下
2、实现smarty类的自动加载
 private static function initAutoLoad(){
        spl_autoload_register(function($class_name){
            //Smarty类存储不规则,所以将类名和地址做一个映射
            $map=array(
                'Smarty'    =>  LIB_PATH.'Smarty'.DS.'Smarty.class.php'
            );

           ...
            elseif(isset($map[$class_name]))
                $path=$map[$class_name];
            else   //控制器
                $path=__URL__.$class_name.'.class.php';
            if(file_exists($path) && is_file($path))
                require $path;
        });
    }
3、创建混编目录,并且定义混编目录地址
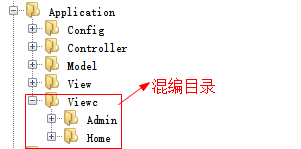
private static function initRoutes(){
  ...
    define('__VIEW__',VIEW_PATH.$p.DS);     //当前视图的目录地址
    define('__VIEWC__', APP_PATH.'Viewc'.DS.$p.DS); //混编目录
}
4、由于前后台都要启动模板,所以应该在基础控制器中实例化smarty
<?php
//基础控制器
namespace Core;
class Controller{
    protected $smarty;
    use \Traits\Jump;

    public function __construct() {
        $this->initSession();
        $this->initSmarty();
    }
    //初始化session
    private function initSession(){
        new \Lib\Session();
    }
    //初始化Smarty
    private function initSmarty(){
        $this->smarty=new \Smarty();
        $this->smarty->setTemplateDir(__VIEW__);   //设置模板目录
        $this->smarty->setCompileDir(__VIEWC__);    //设置混编目录
    }
}
5、在控制器中使用smarty
class ProductsController extends BaseController{
    //获取商品列表
    public function listAction() {
        //实例化模型
        $model=new \Model\ProductsModel();
        $list=$model->select();
        //加载视图
        //require __VIEW__.'products_list.html';
        $this->smarty->assign('list',$list);
        $this->smarty->display('products_list.html');
    }
6、在模板中更改如下:
{foreach $list as $rows}
<tr>
        <td>{$rows['proID']}</td>
        <td>{$rows['proname']}</td>
        <td>{$rows['proprice']}</td>
        <td><a href="index.php?p=Admin&c=Products&a=edit&proid={$rows['proID']}">修改</a></td>
        <td><a href="javascript:void(0)" onclick="if(confirm('确定要删除吗')){ location.href='index.php?p=Admin&c=Products&a=del&proid={$rows['proID']}'}">删除</a></td>
</tr>
{/foreach}
评论 (0)